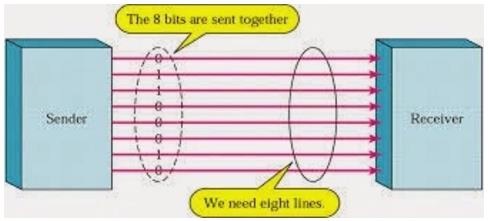
Hundreds of communication protocols have been defined to achieve this data exchange. Each protocol can be categorized into one of the two categories: parallel or serial.
Parallel connection between the Arduino and peripherals via input/output ports is the ideal solution for shorter distances up to several meters. However, in other cases when it is necessary to establish communication between two devices for longer distances it is not possible to use parallel connection. Parallel interfaces transfer multiple bits at the same time. They usually require buses of data - transmitting across eight, sixteen, or more wires. Data is transferred in huge, crashing waves of 1’s and 0’s.

Parallel communication certainly has its advantages. It is faster than serial, straightforward, and relatively easy to implement. However, it requires many input/output (I/O) ports and lines. If you have ever had to move a project from a basic Arduino Uno to a Mega, you know that the I/O lines on a microprocessor can be precious and few. Therefore, we prefer serial communication, sacrificing potential speed for pin real estate.
Today, most Arduino boards are built with several different systems for serial communication as standard equipment.
Which of these systems are used depends on the following factors −
How many devices the microcontroller has to exchange data with?
How fast the data exchange has to be?
What is the distance between these devices?
Is it necessary to send and receive data simultaneously?
One of the most important things concerning serial communication is the Protocol, which should be strictly observed. It is a set of rules, which must be applied such that the devices can correctly interpret data they mutually exchange. Fortunately, Arduino automatically takes care of this, so that the work of the programmer/user is reduced to simple write (data to be sent) and read (received data).
Serial communication can be further classified as −
Synchronous − Devices that are synchronized use the same clock and their timing is in synchronization with each other.
Asynchronous − Devices that are asynchronous have their own clocks and are triggered by the output of the previous state.
It is easy to find out if a device is synchronous or not. If the same clock is given to all the connected devices, then they are synchronous. If there is no clock line, it is asynchronous.
For example, UART (Universal Asynchronous Receiver Transmitter) module is asynchronous.
The asynchronous serial protocol has a number of built-in rules. These rules are nothing but mechanisms that help ensure robust and error-free data transfers. These mechanisms, which we get for eschewing the external clock signal, are −
Synchronization bits
Data bits
Parity bits
Baud rate
The synchronization bits are two or three special bits transferred with each packet of data. They are the start bit and the stop bit(s). True to their name, these bits mark the beginning and the end of a packet respectively.
There is always only one start bit, but the number of stop bits is configurable to either one or two (though it is normally left at one).
The start bit is always indicated by an idle data line going from 1 to 0, while the stop bit(s) will transition back to the idle state by holding the line at 1.

The amount of data in each packet can be set to any size from 5 to 9 bits. Certainly, the standard data size is your basic 8-bit byte, but other sizes have their uses. A 7-bit data packet can be more efficient than 8, especially if you are just transferring 7-bit ASCII characters.
The user can select whether there should be a parity bit or not, and if yes, whether the parity should be odd or even. The parity bit is 0 if the number of 1’s among the data bits is even. Odd parity is just the opposite.
The term baud rate is used to denote the number of bits transferred per second [bps]. Note that it refers to bits, not bytes. It is usually required by the protocol that each byte is transferred along with several control bits. It means that one byte in serial data stream may consist of 11 bits. For example, if the baud rate is 300 bps then maximum 37 and minimum 27 bytes may be transferred per second.
The following code will make Arduino send hello world when it starts up.
void setup() {
   Serial.begin(9600); //set up serial library baud rate to 9600
   Serial.println("hello world"); //print hello world}void loop() {}
After the Arduino sketch has been uploaded to Arduino, open the Serial monitor  at the top right section of Arduino IDE.
Type anything into the top box of the Serial Monitor and press send or enter on your keyboard. This will send a series of bytes to the Arduino.
The following code returns whatever it receives as an input.
The following code will make Arduino deliver output depending on the input provided.
void setup() {
   Serial.begin(9600); //set up serial library baud rate to 9600}void loop() {
   if(Serial.available()) //if number of bytes (characters) available for reading from {
      serial port      Serial.print("I received:"); //print I received
      Serial.write(Serial.read()); //send what you read
   }}
Notice that Serial.print and Serial.println will send back the actual ASCII code, whereas Serial.write will send back the actual text. See ASCII codes for more information.